Wednesday, 26 September 2012

Beauty & The Beast Research


I found this image on google by Rachel Esterline (http://www.rachelmesterline.com/reflections/2012/01/09/beauty/)

Beauty and the Beast by Rachel Esterline
I really like this image because I like how it is taken in her hallway where the shoes would usually be seen, but I think that because the boots are quite out of focus, it isn't that obvious that they're muddy worker boots and just look like black boots. I could emphasise that the shoes are muddy by either moving them closer together and having them both in focus, or I could change the location that the shoes are in (i.e muddy boots in a muddy field - this would emphasise that the boots are muddy and also that the heels are clean and glamorous and show the contrast more clearly.
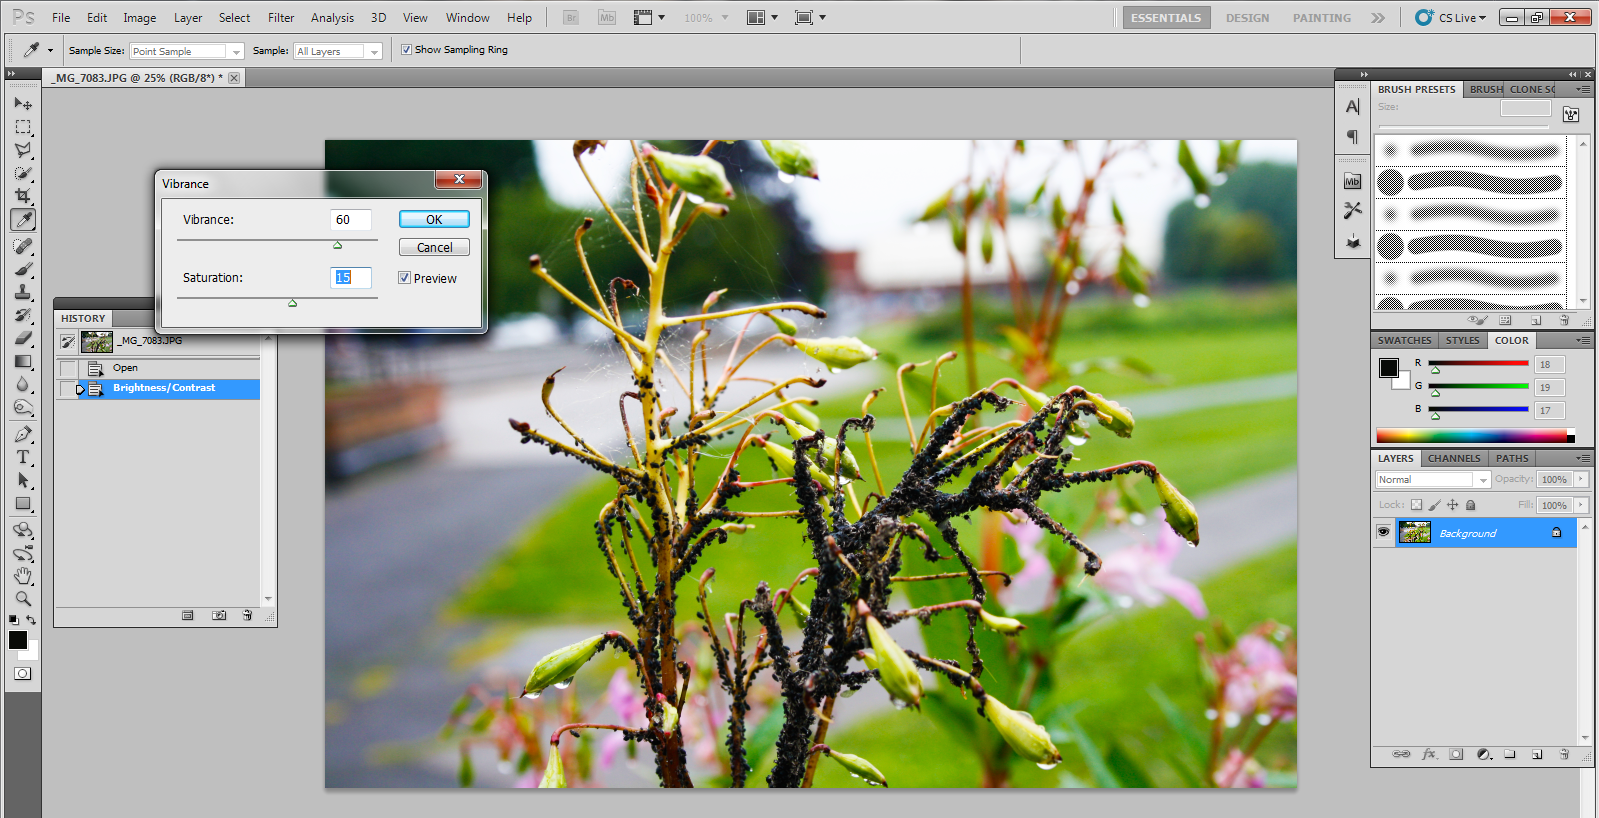
The colours are quite warm colours (because of the hot pink, browns and creams) which makes the image more inviting. I also like how the light has caught the heels and you can see the shine, which just emphasises the whole glamourous feeling.
I really like the idea of putting two items together that represent "beauty" and "the beast" and photographing them in the same place and environment.
I also like how some of the carpet is in focus, because it makes you more aware of where the items are, as apposed to having everything but the heels out of focus which would change what the main features of the image are.
I could use this style by selecting three pairs of things that are on the oposite end of the scale of beauty and photograph them together and also try and keep the colour tones warm so that the images are more appealing and inviting.
I could also try and keep some of the surface the items are positioned on in focus so that the setting in which the items are positioned is also a main feature in the image.
I would probably change the positioning of the objects a little bit so that they aren't so far away from each other so that they are on a similar level of focus in the image because she has used quite a narrow depth of field.
When i take my images i will also use quite a narrow depth of field with the aperture set to around f5-f7 (maybe slightly higher, depending on the lighting because i don't really want a very long shutter speed because I don't want the image to blur, but if it is bright daylight this wont be a problem, however one of my images may be in quite a dark setting so I may have to leave the shutter open for longer and I don't have a tripod to steady the camera to reduce blurring).
Once I have taken my images I will edit them in photoshop to balance the lighting and and to sharpen the image (as Rachel Esterline's photograph is really sharp and in focus). I may also use photoshop to add more warmth to the images if the colours are quite bright and pale as they may look cold which makes them less appealing  ( although they may be visually beautiful, people are less drawn to images with cold tones).

Beauty and The Beast Idea Generation

Here is a list of things People usually consider to be Beautiful or Ugly.

Beauty

  • Plants - Flowers
  • Trees
  • Landscapes
  • Sun
  • Beach
  • Rainbows
  • Clouds
  • Pretty images - Strong Colours - Happy Tones
  • Beautiful People - Models
The Beast
  • Dark Rainy Clouds - Thunder & Lightening
  • Mould - Fungus
  • Spiders - Spider Webs
  • Dirt
  • Dark Images - Scary/ Creepy
  • Monsters
  • Rubbish - Junk - Junk Yard
  • Abandoned old buildings/sheds


Ideas for What I could do for my images.

Take images of things that are seen 
as either beauty or the beast/ugly 
and then edit them on photoshop 

to make them look the opposite 
(Keith Arnatt)


People dressed up in beautiful  clothes, but 
pulling ugly faces.


Have three images that show something 
ugly and something beautiful together 
(e.g. pair of stilettos/ heels next to a 
pair of muddy worker boots.

Take a photo of something (either something 
ordinary - neither beautiful or ugly - or 
a landscape) and then edit it twice, 
so that in one image it looks dark 
and horrible and then in the other 
make it look beautiful.

I quite like the idea of taking photos of two things that contrast each other because I think it would be quite simple but effective.

Things I could use for my images:
  • High heel shoes - Muddy Boots/Old Tattered Shoes
  • Pretty Dress/Clothes - Worker Clothes (Boiler Suit/Tattered Trousers)
  • Nice Hat - Old hat with holes
  • Nice Gloves - Gardening Gloves
  • Socks - Old Socks With holes
I could place the items where one of them suits (e.g. Muddy boots in a muddy field and then put the heels also in the field so that it stands out that the boots are muddy and that the heels aren't and they're glamorous) or i could position them where you would find them in the house (pretty dress in a wardrobe, next to the old tatty clothes, or gloves in the hallway on a shelf next to each other, or two hats on a hat stand [one old and one new] and i could have two people sat next to each other wearing socks, so one is wearing new socks and the other wearing old tatty socks).
I will experiment with different places to see which ones I prefer.

Saturday, 15 September 2012

Beauty & The Beast 1st Photo Shoot

I went around Burton with a camera and took some shots of things that I thought could represent 'Beauty and the Beast'.
I took photographs of various plants and flowers for beauty, and cigarette packets, litter and spiderwebs for beast.

These are my final two images.

Beauty


Beast
I edited both my original images in Photoshop to improve their visual appearance and create some emotion in the images.

Beauty


This is the original of my image. I think it looks quite dark and dull, so I want to try and brighten it up a bit.


I started by changing the Brightness & Contrast.
Image> Adjustments> Brightness & Contrast.
I increased the Brightness to 15 and the Contrast to 48. I did this to try and give it a more cheerful tone as I'm trying to show beauty.


I then changes the Vibrancy and Saturation.
Image> Adjustments> Vibrance.
I wanted to increase the vibrancy and the saturation to make the colours stronger and for a warmer tone, so I changed the Vibrance to 60 and the saturation to 15.


I duplicated the layer...


 ...and changed the blend mode to overlay.
I did this so that I could apply the High Pass Filter.


 I then applied the High Pass Filter.
Filter> Other> High Pass.
I applied a high pass filter because I wanted to sharpen the image so that you could see the fine details in the image more clearly, as there is a lot of detail on the plant. I changed the Radius to 4.0 pixels because I thought this suited the image.


I then merged the layers down into one layer.


Then I cropped the image down because I thought there was a lot of extra space around the photo that I didn't need.


I then created a new layer. I selected the colour square and used the dropper tool to chose a colour and I used part of the plant in the image to find the colour I wanted. I then selected the brush tool and painted over the whole image.
Then I selected the eraser and set the size to 1200px and 0% hardness. I then erased the center of the image where the plant is and changes the opacity level to 14% so that the pink colour was quite faint around the edge but still visible.
I did this because I wanted to create the warm tone and at the same time bring out the pink in the plant because I thought the image was quite yellow and green.

I then flattened the image.


Beast

This is the original image. I want to try and darken it a little bit and make the spiderweb really stand out, because at the moment the spiderweb is kind of a similar colour to the background and it all looks quite grey. I also want to try and make it look slightly creepy.


For this image I wanted to make it more dark and creepy, so I started by changing the Brightness and contrast.
Image> Adjustments> Brightness & Contrast.
I changed the contrast to 100 because this really made the spiderweb stand out against the dark in the background. I left the brightness at 0 because I didn't want the image any lighter and if I lowered the brightness, then the spiderweb would become less visible.


I then wanted to change the Vibrancy and Saturation Levels.
Image> Adjustments> Vibrance.
I lowered the saturation to -25 so that the green at the bottom of the page was less bright and standing out but still green. I left the vibrancy the same because I didn't think it looked any better with it raised or lowered.


I then wanted to apply a High Pass filter to the image so I duplicated the layer...


...and changed the blending mode to overlay...


...and then i applied the High Pass filter.
Filter> Other> High Pass.
I set the Radius to 4.0 pixels because this was the sharpest I could get the image before it started to blur around the edges.


I then merged the layers and then created a new layer.


I then selected the brush tool and painted over the whole image with the colour black. I then selected the eraser tool and made it size 1200px and 0% hardness so that the black would fade into the image, and erased in the middle so you could see the spiderweb underneath.
I also changed the opacity to 65% so that the black was more subtle on the image.

I then flattened the image.


I'm pleased with how both my images look because it think they represent beauty and beast and I think they work well together because of the contrast of colours and they both have colour painted around the edges.
In my Beauty image the tones are really warm and inviting. This can make an image quite comforting. I also really like the sharpness in the image because you can see all the fine details in the image and all the rain drops and spider webs. I think the original image looks really pale and dull (which is mainly because of the weather because the sky was grey and it had been raining) so I am pleased with the changes I made using Photoshop. If I were to edit this image again, I might make the image less pink as you can see the pink around the edges. I think I should have made the opacity lower so that it was less visible and more subtle.
Although my beast image is mainly grey and black, I think it still has warm tones because of the brown tint that it has and because it it quite dark. Also because I left the green in the image and it is still visible in the image. I really like how the spider web stands out against the dark background, and I think that because it was raining the spider wed has more detail and is even more visible. If I was to edit the image again then i would probably try and make the image look warmer by either changing the Hue or adding a a new layer over the top with a warm brown and them editing the opacity so that it just has a slight colour to it and then use a large eraser with 0% hardness and erase the main parts like the spider web so that it would still be white clear lines.
I think the images have similarities but I think if I were to do this task again then I would try and make the two images have similar content (i.e. beauty - Spider Web, beast - Spider) and not just the effect that I apply.
Overall I'm pleased with the result.